Sunday 4 November 2012

Just a few buttons and flowers ....

Those that know me in the flesh so to speak in the crafting world know I have a lot of flowers in my stash and can easily be swayed to purchase more.  It's fair to say that I have a boxful, if they were real I could probably do half a dozen gardens at the annual Chelsea Flower Show.  And to go with this boxful of blooms are three (large) glass jars of buttons and of course yards and yards of fabric.

Last weekend I stitched a most delicious cream concoction of fabric, just layering up the fabric to create oodles of textures.  It was well "strokable" if you get my drift. I thought I'd do my usual and use on an A6 size picture frame but then thought, no I need to go big as I don't want to loose sight of of all cream delight when I start adding other stuff.

So big I went.

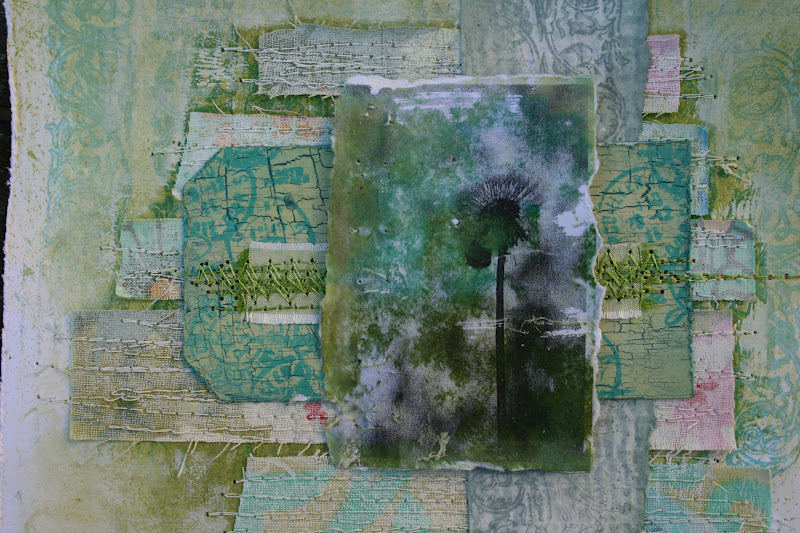
Off white paper had some Distress Inks added, water flicks and some spray inks to create a background.  Some extra bits of fluff and fibres sewn on with some ripped up pages from old textbooks (I feel such a rebel mutilating a book in this way, seeing as I'm supposed to be a guardian of text in the day job).  

Some stamping using some really nice large PaperArtsy stamps. Whilst the ink was still wet from the stamping I sprinkled pinches of embossing powder over the image, didn't want it all embossed just "bits" to continue adding texture.

On the fabric panel I added one of my photos. the panel was then sewn to the background and then I got that box of blooms out and those jars of buttons and armed with my hot glue gun just started sticking stuff down.  After the gluing I did some light spraying - just to tone down some of the really vibrant pink and apricot flowers and added some Treasure Gold on the buttons.

Many of you will say - ah she's just copied the fab work of Finnabair.  And yes I'd agree with you in terms of I find her work stunning and really inspiring but I wouldn't say it was a complete copy. 

Right I need to be away as we have a christening to go this morning.

hugs
jo
xx

Tuesday 23 October 2012

fabric 'an fibres

Evening all, just a quickie tonight to share the weekend project.

Saturday and Sunday saw me giving my sewing machine a real good workout creating this.  I've said it before and I'll say it again fabric is my true first crafting love and it was great to get all my fibres and fabrics out and just well - play frankly.


I knew I wanted to start with felt oblongs to act as a base and then start using lots of merino wool, silk throwers waste, sari silk, metallic thread and variegated thread to make lots of layers.  It was really fun just layers down bits and bobs and sewing backwards and forwards to secure it all on the felt.  There is also a bit of stencilling and spraying with Glimmer Mists.

On Sunday I raided the "small" fabric stash to look for co-ordinated fabric to make some flowers.  I painted the back of the fabric with PVA to stiffen it slightly, let that dry and then cranked out some flower shapes (there was a lot of cranking to get through the fabric).

Right off to sort tea out and flick through a lovely new quilt book that arrived this morning - perhaps I'll use some of the stash making a quilt!

hugs
jo


Saturday 20 October 2012

It started with a tree ...

Firstly on the patient front, we seem to have turned a corner yesterday, my cheeky fun loving husband made an appearance yesterday afternoon which was great.  But then we did have a fainting episode whilst watching the local news (laughing too much at the presenters playing James Bond in an Aston Martin).  My brother who'd come round to watch the rugby found it highly amusing to see me slapping John shouting at him to wake up. On the whole though, I think we are through the worse.

Whilst rummaging yesterday in my copious quantities of stash (purchased, looked at and not used - we've all got it haven't we) I spied a packet of 3 wooden trees and thought ooh ooh Scandinavian look.  to be honest I had just been in NEXT mooching around their home wares section whilst waiting for my prescription looking at the Christmas deccies, so it may not have been a real original thought.
 
I started off with a tag cut from mountboard. Firstly I put a couple of coats of  Hyde Park on it, swiped a candle down it to act as a resit and then put Chocolate Pudding over it. Rubbed it back with some sandpaper to reveal the green and then added Mocha Mousse, and Irish Cream Fresco Finish paints to lighten it up  and add depths of distress!.  Then using a real old manky wide brush (I never clean it as I want the bristles really hard) I dry brushed some Nougat on the top. I wanted a sort of weathered wood look. Added some swirls of Baltic Blue through a stencil and stamped some text in Aquamarine Archival.  Finally some White Fire Treasure Gold and Walnut Ink around the edges.

The tree was painted in French Roast and Then Nougat lightly added on top. Some gentle sanding to reveal the French Roast. Well I say gentle sanding I did manage to break one of the branches at the top hence the button! This was stuck onto a piece of rough linen again stitched onto felt.

The cardboard back was from PaperArtsy, loads of layers of Chocolate pudding, Mocha Mousse, Irish Cream. Some text stamping in Aquamarine.  French Roast stencilling and finally White Fire Treasure Gold and Walnut Ink around the edges.

Well I'm off to put away all the paints and inks and get out my fabric and fibres, I feel the need for some grungy stitching this morning followed by some delicate sewing this afternoon whilst watching various rugby matches on the telly.

hugs
jo
xx

Thursday 18 October 2012

Autumn Fire

Brrr, it's getting mighty chilly here in the Shires - have you got the heating on yet 'cos we certainly have (although I am enjoying settling down under one of the many blankets purchased or crocheted by moi in the evenings and the cats quite enjoy it as well)

I've not been at work this week, haven't been away just acting as nursemaid for my quite frankly very poorly husband - who'd have thought adults could get whooping cough and did you know how noisy it is and how it can make you faint and be sick?  Hum no nor did I but it does, hence nursemaid role (not a natural role for me and I'm having to employ all my actor skills to do the role justice)

Anyway in between nurse duties I've been working on this. 

I made a card for my niece a little while back that used oranges,browns, golds and reds in a bit of Klimt style, I really liked it and thought I'd use the same colour scheme and make something for me. It didn't quite turn out the same but I like it!

The frame was painted in nearly all the oranges and yellows in the PaperArtsy Fresco range with some Inca Gold on top and stamped with a crackle stamp in Archival Monarch Orange.

The background card was painted with numerous layers of the same oranges, yellows and red from PaperArtsy.  Some Gold embossing powder was sprinkled on in places before the paint dried and that gives the lovely raised texture in places.  The harlequin stencil was used with with London Bus and Cinnamon and some of the Sapphire Treasure Gold (believe the hype ladies and gentleman it really is fab). One of my new ATC sized text stamps from PaperArtsy was stamped in the Monarch Orange and finally more Sapphire and Topaz Treasure Gold in places, edges distressed and some trusty Walnut Ink to add age.  Some fabric and stitching to add a bit more texture and colour.

The smaller tag was painted in a mixture of London Bus and Cinnamon and then Butternut Squash over the top.  edges rubbed back to reveal the base coat.  The same text stamp was used but this time in Sienna and then some Glimmer Mist in Turquoise, Suede and Tiger Lily.  The Tiger Lily is the big copper splodges, the nozzle was blocked so I just took the dropper out of the bottle and pumped what was in the pipe.  It falls out of the bottom in big splodges and when I dried it a bit too close it bubbled up a bit. Happy accident but I love it! 

The red dahlia print is an image transfer of my one of my photographs using the Satin Glaze technique from PaperArtsy.  I've sewn it on some felt to give it a bit more stability.

The flowers were a scrap of paper cut using the Tim Holtz  Tattered Florals Strip Die, inked with Barn Door, sprayed with the same Glimmer Mists and Perfect Pearls in Heirloom Gold and a brad in the middle. 

So it's taken me nearly all week to finish, but it has been nice to do something, go away to be nurse and come back do a bit more.  I like how it's sort of organically grown into this thing of beauty!

Right off to check the patient!

hugs
jo
xx


Sunday 7 October 2012

Where did you go to my lovely?

I blame sport, the sheer quantity of inspiring, stunning, awesome, fantastic sport that was London 2012. I enjoyed watching every minute both on TV and in person.  To see two gold medals won at paralympic events, to stand up and cheer athletics home, to scream so loud it hurt your ears, to cry as you stood together with so many people and sang the national anthem will stay with me for a very long time.

Also I just didn't want to craft.  I've still been making stuff like huge quantities of jam and chutney, but I just didn't feel like getting inky.

So what made me get all the stuff out?  Well going and buying new stuff last weekend at Colemans Demo Day and catching up with good friends (you know who you are xx).

The frame has been made for a little while (French Roast base coat, crackle glaze and Nougat top coat) and sat on my desk.  I was going to use one of my photo's of a mussel shell I took whilst in Southwold, but the size of the photo and the frame just weren't working.  I've realised that the photo needs to be incorporated into a bigger piece (next project or the one after).

So pondering on it for a bit I knew I wanted to keep it simple, the frame is gorgeous and I didn't want to overpower it, so a heart simply framed would work I figured.

I started off adding strips of ribbon, lace, fabric and fibres to a felt background.  Some watered down fresco paints in Pansy and Hyde Park were added in places to give a worn shabby look. 

On top of this I painted some PaperArtsy metal card with Pansy and Hyde Park and ran it through an nice new sewing tape embossing folder.  Rubbed it back to reveal some silver and added walnut stain Distress Ink in places to further do the shabby thing. Stapled that to the fabric background.

After purchasing some new Stampendous mica fragments, glass glitter, embossing powder I knew I wanted to test them out and the heart seemed a good place to start!  Cut out a cardboard heart using a PaperArtsy die.  Painted it in Nougat, then added some walnut stain and then covered it all up with layers of gold embossing powder mixed with Vintage Photo distress embossing powder, various bits of glitter and mica sprinkled here and there.  Added some eyelets which were brown but when sanded went purple (!!!!!) and edged in Walnut stain.

Then I started sewing!  

Started off with some flowers and buttons and then gave it a light misting with Cinnamon Glimmer Mist Finnabair style.  After this had dried I started adding various beads and pearls to give event more texture.

Finally stuck the felt to the acetate that comes with the frame and stuck that to the frame.

It was really nice to get back into things from a textile / paper perspective rather than a sugar and fruit perspective (still doing that though.lots of plums on the tree and a big sack of jars that need filling - anyone got any good plum chutney recipes?).  

Right need to make a birthday card for my most gorgeous grown up niece who is eighteen today - where did that time go, but more importantly all that time in front of her to continue experiencing life.

Hugs

jo
xx


Sunday 29 July 2012

Granny chic

I haven't really been very creative lately, the old inspiration seems to upped sticks and gone AWOL and to be honest I just haven't really "felt like it".  I did made a birthday card for my husband and a sympathy card for a friend at work and last weekend I was creative in the kitchen baking but that's about it.

But I did finally finish my big granny square blanket last night. 
 
This has been on the go for months, it sits (or should that be "sat" as it now "sits" on the arm of the sofa waiting to be used) in a basket on the hearth in the living room. I periodically pick it up and do a few more rounds whilst watching TV.  I love crochet like this, it doesn't need me to follow a pattern and the rhythmic nature of looping the tactile thread is quite calming.

It's good to get a project finished and there are other unfinished projects in the wool basket like the bagpus scarf but what's really calling me is the lovely soft alpaca wool in gorgeous fawn and light brown neutral tones I got at a NEC craft show last year.  

This time rather than one huge granny square I think ones about "so big" (I was holding my hands up, but that doesn't really work in a text document does it so I reckon about 8" square- hold your hands up and you'll get my drift) joined together in with slightly off white / creamy alpaca.

I need to go shopping I don't think I've got enough wool.

hugs

jo

Sunday 8 July 2012

Rusty

Oh deary me, it's been a tough couple of weeks on the old health front I have to say - bronchitis in July is not what you expect.  Never mind though we are slowly getting better and we have a few days away soon in Southwold on the east coast to look forward too. A bit of sea air and some Adnams ales will see us right I'm sure.

Speaking of sea this is what I've made slowly this week.  I love the PaperArtsy hotpicks sea themed plates and I've got lots of ideas for using them and this is just one.  

I have to says I struggled with it a bit, made the frame with and the A6 sized card but wasn't sure if they fitted together. So I tried colouring an 8x8 piece of card to put the A6 card (which I really loved) but that didn't really work and ended up in the bin.

Finally went back to the frame and realised what the problem was.  There wasn't enough contrast between the card and the frame and I was looking to get a really rusted wetherworn look to it all - solution? Rusty Hinge Distress Ink (name gives it a way really doesn't it). I used that to go round the edge of the card and finally got contrast!

You can't really see it but the A6 card has a crackle glaze finish in Inky Pool on the bottom and Ice Blue on top.  The fish from the various plates were stamped in grey Stazon which is less "in your face" than black Stazon.  They were coloured in China Blue Distress Stain and a bit of dry brushing in Honeydew and finally that Rusty Hinge Distress Ink.

The shell was stamped in Aquamarine Archival on a calico that had been given a light wash of Ice Blue. I used the Pacific Oysters stamp to add the lines around the edge (just inked up the edges) Little bit of Rusty Hinge around the edges.  Glued onto a piece of Kraft card and the eyelets added.  This was then glued onto the piece of Crunchy waxed paper that had been stapled onto the A6 card. 

I'm really pleased I had the brainwave of the Rusty Hinge because I think it really lifts it and ties in with the Crunchy paper, Kraft card, string and eyelets to give it that left out in the sea air kind of look.

Well it's a major UK sporting afternoon ahead, the tennis wins in our house (even though Silverstone is only 10 miles from us and all we've heard this morning is helicopters going over). I  shall sit and watch it adding some border rows to my granny square crochet blanket - keeps me warm on these chilly summer evenings!

hugs
jo
xx

Sunday 1 July 2012

Just a touch of texture

Well it's been a bit like the plague house here in the Shires, both John and I have had stinkin colds, he's had his for over a fortnight and finally went to the Docters on Friday to be diagnosed with bronchitis and still running a temperature! Me, well I've had lots of coughing, wheezing and varaible vocal changes. I have two presentations to give on Tuesday and seeing as the lady on the cheese counter at Sainsburys couldn't understand me today it could an interesting experience.

I started working on this yesterday, all the "bits" (well fabric) had been laying on my workdesk all week to be honest but just didn't have the energy to play. I really enjoyed reading about Fran.tage in the July Craft Stamper and having purchased some delights at The Stamp Attic I was keen to give it a go.

I started off with a chipboard flower which I painted in Fresco Finish paints in French Roast, Chocolate Pudding and Irish Cream.  Whilst the top layer of paint was still wet I sprinkled on some Stampendous Aged Ivory embossing powder, Some Nutmeg embossing powder and some Antique Photo Distress embossing powder.  I then had to carefully heat it all to get it to melt - now that was a fun experience.  

After I'd added some more embossing powders as my long cylinder heatgun blew it away first time (and second) I managed to get it to melt and bubble ( I ended up doing it quite high and from underneath as well - me thinks I need a new heat gun).  I then used some glossy accents to add some crushed up Stampendous Tarnished mica flakes.

I am SERIOUSLY liking this stuff and want MORE. 

A metal flower and snap fastner coloured with alcohol ink added to the centre. The stem was a peice of florist wire covered in tissue tape.

As per usual there are lots of layers all stiched on.  From the bottom up we have:
  • a peice of frayed linen
  • a peice of book text inked in Brushed Cordory Distress Ink and Picket Fence Distress Stain.  A Swirl inked in Coffee Artchival and some Antique Photo Distress Embossing powder
  • a small peice of PaperArtsy Crunchy Waxed Kraft Paper stamped and scrunched.
  • a peice of off white cotton
  • a peice of frayed hessian
 
An oblong of Kraft card was inked in Frayed Burlap and Brushed Cordorouy, cut with a die to give the perforated page hole on the left look. A ledger stamp stamped in Coffee Archival and Antique Photo Distress Embossing Powder.

Some more fabric and ribbon across this and some lace and ribbon top left. I then decided to hand sew an awful lot of buttons, beads and pearls on (well I say an awful lot, not really but you know what I mean).  

Everything was stuck onto a lovely painted and distressed IKEA frame.  

So that's what I created in between coughing and sleeping and blowing my nose and coughing and drinking like a teetotal fish. I really enjoyed the hand sewing and think I'd like to do more, perhaps on a bigger scale .... 

hugs

jo
xx


Sunday 24 June 2012

Mocha,Chocolate, Butterscotch, Caramel or Hazlenut???

Well things aren't too bad here on the ranch, perhaps that should be prairie as Mr trusty beast of a lawnmower has decided that enough is enough and he doesn't want to play anymore until he's had some TLC and new parts.  This means that the lawn hasn't been mown in a fortnight  and with all the rain its getting so long it's a job to see the cats lying down it!  I know the simple answer is to borrow one but the other half has had man flu all week which has meant he has had to stay in bed or on the sofa nursing and perfecting his cough (I could never be a nurse, no tolerance or sympathy at all).

So a touch of brown eh for Simon Says Stamp and Show?  Well after going on a stash spending trip last weekend with Lin and Karen at the the lovely Stamp Attic I bought more Prima Flowers. 

I know I have a gazillion already, but they just winked at me in that you know you want to buy me way and just I cannot resist.  In the original excessive collection of flowers are some brown ones, so in an effort to actually use some and reduce the size of stash (Chelsea Flower Show has nothing on me in terms of flowers). I though I'd base whatever I made around flowers  - lots of them.

Back to old trusty 8x8 this week and a piece of brown core-dinations card.  I sponged on some Fresco Finish French Roast, sanded that a little bit and then added some Chocolate Pudding through a flower stencil. Some more sanding and then Inka Gold through another stencil to give the tiny gold squares (bit sort of Klimt like if you know what I mean).  Heavier sanding along the edges and finally some swirls in Coffee Archival. 

You can't see most of this, but I know it's there and ~I think it adds texture and depth to the background and more importantly I enjoyed doing it!

I cut some old brown paper with the Vintage Cabinet die and added thin layers watered down French Roast over it.  Embossed it in a swirly folder and added Gathered Twigs Distress Stain over the top to highlight the raised embossing. Finally some text stamp in Picket Fence Distress Stain.

The tag was originally Kraft card which was painted in Chocolate Pudding, some Crackle Glaze over that, a top layer of  Irish Cream and then a watered down wash of French Roast over that.  Some flower stencilling and finally some stamping and embossing (the crackle layer looked superb but you can't see it now as I've covered it up with the stamping and embossing!).

Layered it all up with some corrugated card, ribbon, buttons and of course lots of flowers!

Hugs

jo
xx

Monday 18 June 2012

Shabby Jubilee

Well better late than never I suppose!  

To be honest the jubilee weekend sort of passed us by, we didn't watch the Thames flotilla (I couldn't get it to be honest just watching boats go by, it sort of reminded me of golf - fine if you are playing but is it really a spectator sport???), couldn't face watching ageing queens and pop stars trying to sing on a roundabout and completely forgot about the service at St Paul's until it was half way through!

I bought a Union Jack embossing folder ages ago from that well know retail park crafting emporium in the UK and thought it was about time I actually used it.  So embossed a scrap of Tim  Holtz paper, added Festive Berries and Tumbled Glass Distress Ink over the top with a bit of Chipped Sapphire as well.  It then sat on my desk for a couple of weeks (you know, just sort of lying there you occasionally pick it up, waft it about a bit, put a bit more Distress Ink on it, say you like it and put it down again).

Finally this weekend I decided to do something else with it.

Now I really enjoy working in an 8x8" format but recently I've felt the need to go bigger (now now all you smutty devils - keep it to yourself).  So went for a 12x12" sheet of green ledger old patterned paper I had knocking around (knocking around, who am I kidding, I've got piles of 12x12. I reckon I've got a tower of paper that might just make that Shard thing they are building in London look like, well a small thing).  

I put a layer of gesso over the top and then started adding colour.  Glimmer Mist in greens and blues, the same Distress Inks as I used on the flag with loads of water droplets to give that shabby look. Once that was dry I stencilled over the top in Pansy for the text and Hyde Park for the circles. Some sanding all over and Walnut Stain Distress Ink round the edges.  Finally the stamping was in Grey Stazon using Tim Holtz wings and crown.

Over this base layer are various elements. I used a Tim Holtz ATC stamp that had crowns and lions on it (tres regal)  on three ATC sized card pieces. They all had Guacamole and Mermaid Fresco Finish as a base layer. Perfect Pearls powder in blue was put over the stamping, I distressed edges and added Festive Berries round the edges.

The file folder was inked with Tumbled Glass and Festive Berries dry embossed in a folder and Walnut Stain added to highlight the embossing.  

Added my usual strips of fabric (the red horizontal strip really pops and ties in with the flag, so glad I was brave and added it in) and loads of Prima flowers to complete.

I am dead chuffed with this and might have to have a trip to IKEA to get a frame to display it in rather than popping it in a 12x12scrapbooking album. Just need to find some wall space to hang it!

hugs

jo
xx

Tuesday 5 June 2012

Rum and Raisin

Well it feels like ages since I popped here and left a post (it probably is, but I'm not going to look at dates and anyway how do you quantify ages, um?).  

It's been a busy week as well what with a funeral, always emotional but sometimes more so when the person you are saying goodbye to and celebrating their life is not that much older than you (ones own mortality really gets smacked in the teeth by Dr Death)

This was followed by an overnight trip to Leeds for the HEIST Education Marketing awards. Big hotel, posh frocks everywhere and the little ole library came second in its category, we were well chuffed.  Of course I managed to get my heel stuck in the staging when we went up to collect our award and had to have my leg yanked out forcibly in front of nearly 300 people and it was all being videoed and photographed  - only me, mind you didn't stop me bopping afterwards (bopping?  BOPPING- it could be worse I could have said boogieing!).

Anyway enough of my hectic life and back to art!

I love this, I've had it finished for well over a week and I keep smiling every time I look at it, I love the colours, I love the textures, I love the composition -  I am one proud mama to have produced this!

It's essentially made up of three components: the frame, the fabric layer at the bottom and finally the tag.

I started off with an IKEA frame and painted it in Fresco Finish in Chocolate Pudding, over the top with some crackle glaze and then a layer of Nougat with a spot of Chocolate pudding.  The brush I used had some red left on it (obviously didn't clean that brush) hence the slight hint of pink in the top layer. An oblong of calico that was painted in nougat and stamped in Coffee Archival with a large text stamp from PaperArtsy. A strip of hessian and a scrap of corrugated cardboard stitched onto that.

The second component was the fabric scraps at the bottom.  I started off with some cream coloured felt, cut the edge with the Tim Holtz scallop die and the added layers of scraps of fabric, lace and ribbon.  The felt gives a really strong but soft  base layer for all the flimsy fabric.

Finally the tag, the spots were added through a mask with Chocolate Pudding again and then Picket Fence Distress Stain over the top just to tone it down a bit.  The large PaperArtsy numbers stamp was added over the top in Coffee Archival.  

A little bit of sanding and distressed the edge and added Walnut Stain Distress Ink around the edges.  A couple of bits of fabric and the most gorgeous pink spotted grosgrain ribbon (I've been hoarding this reel of ribbon for ages and finally plucked up the courage to CUT IT!) stitched on the bottom. You'll recognise the rose photo from previous work and again it has been sanded and had some Rock Candy over the top.  A bit of string, a Prima flowers and button centre to finish.

It's the last day of our loooong Jubilee weekend here in the UK, the weather is suitably bank holidayish - rubbish (see so typically British talking about the Royal Family ad the weather), so I'm off to have a play in my craft room!

hugs

jo
xx

Sunday 27 May 2012

Allium

I'm not going to say much about this apart from I made another A3 size collage picture for our bedroom.  This time in blues and greens inspired by the lovely paper I got from PaperChase in London last week.  Not much stamping but quite a bit of paint, loads of stitching. gorgeous fabric and of course one of my photo's suitably distressed with sandpaper and some Peacock Blue Distress Stain swiped over it.  

Hugs

jo
xx

Monday 21 May 2012

Hot stuff!!

It's been a while I know since a) I made anything and b) since I posted. Let's just say all work and no play makes Jo a bit of a grumpy girl!

Anyway I have finally managed to make something and yes it's a bit bright and a bit out of my comfort zone colour wise -  I must be craving some sunshine and heat (aren't we all, I can't believe I'm still wearing opaque tights and boots in May and the shops are full of summer clothes, they must be begging the sun gods to shine so that they can sell stuff!).

I am very very VERY pleased with this (don't mean to sound big headed but ...) as I've managed to crack a design issue I've been having for a while - how do I use the all the wooden IKEA frames I've got as a base for my fabric creations without them sagging in the recess?????

I've tried making them into mini canvases or sticking on to card, but they never really sat well or looked lumpy (bit like me really when I think about it) So what was the brainwave eureka moment?  Use the acrylic front piece as the base for the fabric which gives it rigidity and stick that to the front of the frame. Oooh it did make me a happy girl!

So painted the frame in Butternut and Haystack Fresco Finish paints, sanded it back a bit, rubbed a candle over it and then dry brushed a mixture of Claret, Paprika and London Bus over the top.
Took some calico and sponged on Butternut and Haystack and then stencilled Pumpkin Soup through a flower stencil. Sewed on some hot pink and orange strips of fabric with lots of "bad" stitching!

The tag was painted in Claret, London Bus and Pumpkin Soup and stamped in Cherry Stazon using a Wendy Vecchi flower stamp, edges distressed and inked with Fired Brick Distress Ink.

The photo is one of mine, just printed on photographic paper at home. I sanded it carefully to remove some of the ink and add some distressing (love the "spots", it makes it look like an old sun weathered photo from the 70's). A thin layer of PaperArtsy satin glaze with a tiny amount of Dolly Mix Fresco Paint over the top.

A scrap of pink felt underneath and two Prima flowers that had been hanging out on my desk left over from a previous project to complete.

Right, I'm off to work on one of my big pictures with the lovely papers I bought in PaperChase in big ole London last week and some teal / turquoise fabric I bought on Saturday - I only went in for a couple of fat quarters and came out with about twelve!

hugs

jo
xx


Monday 7 May 2012

Why?

I have many crafting items including wool. It's fair to say I have a lot of wool, boxes and bags of it and all I can knit is scarves, oh and crochet granny squares. I have so much wool that at Easter I sorted through it and decided to donate some of the more lurid acrylic I'd purchased honks ago.

So why dear blogger friends did I purchase this a couple of days ago? I have wool in this colour range in the stash, I have knitted scarves in this colour way already, so why?

Project in mind? Yes to make a wrap for a fawn strapless dress I'm wearing to a function at the end of the month. So why did I buy this colour way rather than a nice soft neutral cream?

Impulse buy, obviously.

I sense another scarf, or possible I'll be daring and knit a snood!

Hugs

Jo

xx


In the red

Time, there are apparently 24 hours in a day and 7 days a week, so thats lots of hours, right? Lots of hours supposedly to do everything we need to do (work, sleep, eat) and want to do  (craft, relax, blog).  So why doesn't it seem it this last fortnight?  

The needs, mostly work, the stress around it and the sleep needed to recover from the stress and intense working have taken over leaving very little time for the wants that in truth actually help with coping with the needs - caught!  But yes before you all start tutting and shaking your heads, I know (and I am) I should be grateful that I have a job, and that it is a good job but sometimes it's hard work and I get annoyed with it.

I had intended to be determined this week and get my contribution to Hels Sunday Stamper Challenge in on time. But due to the above time was running out and I thought I'm gonna miss it again. But then I thought, you know what it doesn't matter, you have to work to deadlines at work, crafting is your hobby, your downtime, your creative release, the only decisions you have to make is where to place something.  

In my craftroom I am my own boss and I don't have to respond to others or lead / manage others - it's just me and sometimes the cats.

So here is my take on last weeks challenge which was red.

Got all my red Distress Stains and Inks out and the lovely vibrant London Bus Fresco Finish and set to work. 

Started with my usual 8x8 card.  On top of that I inked some patterened paper stamped with some text stamp (very hidden now but it is there) and sewed on the card after distressing the edges.  

Added some layers of spotty fabric which I'd purchased on Saturday after a quick jaunt out to Bramble Patch in Weedon with my Ma (3 errands in an hour that day: deliver a large lamp to my mums friend for painting in a barge style, buy jam jars for rhubarb chutney making and look at fabric to back her latest quilt. All three just off the A5 either at Weedon or 2 miles up the road - my kind of shopping!

A spare bit of the red card (I'd cut a 12x12 down to 8x8 and that leaves enough card to make tags) was painted in some Limelight Fresco Finish, some crackly glaze on top and then some London Bus. Rubbed it back quite hard to reveal some of the LimeLight and then stamped Photograph in Black Archival and some reverse text in Cherry Stazon. Some felt and red ric rac added on the bottom of that and one of my distressed photos that had  a swipe of worn lipstick over it was stapled on.

The flowers are of course Wendy Vecchi.  Some scrap red patterned paper was stamped with as many flowers as I coud get on it in Black Archival then some cherry spray ink and Pefrfect Pearls sprayed over. Cut them all out and added them on trying not to obscure the fabric or the photo!

Ok well it's a bank holiday in the UK today, it isn't raining at the moment but who knows whether the taps will turn on later.  

Today I have some lemon curd to make and need to do something with the rhubarb I cut yesterday and didn't use for the chutney, which is absolutely delish I have to tell you and it will be hard work waiting for a month for it to mature! 

hugs

jo
xx

Sunday 29 April 2012

Testing, testing ...

So I finally did it and went and purchased an iPad. So far yep I like it and John tells me it keeps me quiet ( um).

Work in progress on my desk including the back end of the cat (not a work in progress).

Hugs

Jo

Saturday 14 April 2012

Blue Numbers

Considering I've had a week off, tell me why has it taken me till Saturday to make and submit my entry for Hels Sunday Stamper Challenge?  As ever last minute Nellie that's me!

So the theme was numbers to celebrate 200 challenges, I pulled out all my stuff in relation to numbers and selected some blue card (well I say selected, really it was a sheet of 12x12 lying on the sofa in the craft room that I just happened to pick up rather than go through the stash).


Cut the 12x12 down to 8x8 and used the off cuts to cut the tags and the embossed background.  I used South Pacific Fresco Finish paint all over and then stencilled in Pea Coat and went over the top bumping a bit to give the shadow in Ice Blue. Plus a bit of sequin waste with Pea Coat as well.

The embossed oblong was first painted in a mixture of Baltic Blue and Ice Blue, embossed and then sanded a bit heavier over the large numbers which were then inked with Walnut Stain Distress Ink.  the edges were more roughly dome to expose the pale blue of the card.

The clock is grunge paper inked in Baltic Blue and then Weathered Wood Distress Embossing powder added, not all over to add to the distressed look.
 
The large tag was painted in South Pacific and then Baltic Blue dry brushed over and then it was sanded as well. The PaperArtsy number stamp was stamped in white ink.  Edges roughed up and Walnut Stain Distress Ink added.

The small tag was painted in Ice Blue and South Pacific, sanded and Pea Coat stencilled over that.  A sanding to flatten the paint ands remove some of it and the Tim Holtz quotation added in black and embossed.  Some Prima flowers and Craftworks Card Candi added in the centres. You can also see some silvery blue Stickles on them as well.  This was an experiment for the centres but it didn't really work so I painted some white Candi blue to match the flowers but there were still bits of Stickles around.  In hindsight I'd rather have just gone with the Candi but they sort of match the silvery pale blue ribbon at the top, so reasonably happy.

So a big thank you to Hels for organising this challenge week in, week out and I don't always get to play but when I do it's great to stretch your imagination within the limits of the theme.

hugs

jo
xx

Friday 13 April 2012

Shabby Wreath

Sometimes a stayvacation (not going away) is really good.  This week I've pottered around at home finishing of projects in my craft room, tidying it up and throwing stuff away that I know I'm never going to use. It was quite therapeutic.

I really do hate clutter, seeing it, surrounded by it clutters my brain and weighs me down and I have difficulty doing anything as I attempt to wade physically and mentally through piles of stuff. Don't get me wrong the house doesn't have to be super neat (house work really is a chore and is endured for the minimum amount of time, there are much better ways to spend my free time), lived in is fine as long as once you've finished with it put it away.

So this was once of those projects that had been half started and then left lying in my craft room since Christmas and yesterday it got finished.

I tool a wire coat hanger and wrapped some quilt batting around it and then covered in strips of calico.  to be honest the quilt batting isn't necessary but I had some odd bits hanging around (see use it up or throw it away).

Next I took some old fabric in this case some pillow cases from a charity shop purchase and ripped them into strips (I love the sound of ripping fabric such a sharp purposeful noise), then cut these into approx 4" strips.  Each strip was tied in a knot around the wrapped coat hanger until it was full. 

A bit of fluffing and ruffling to make sure the ends weren't all in straight lines and a shabby wreath is created!  I might add in some wisps of ribbon here and there to break up the white a bit but I ain't rushing to do that, I 'll just look at it for a couple of days and see whether it really needs it.

It's hanging on the craft room door facing onto the landing, so far husband either hasn't seen it or has decided not to comment! 

These pictures were taken half an hour ago outside in the damp sunshine in amongst the plum blossom and now the fog is rolling in - Spring eh!

Right I'm venturing out today to see the lovely Gabrielle for cake, coffee and a good ole chat!

hugs

jo
xx

Wednesday 11 April 2012

WOYWW 149

Just a quickie this morning for the weekly snoop around the crafting world engineered by Julia

As you can see not much on the desk apart from the sewing machine and some fabric. Yesterday and today is all about patchwork! I had these strips of fabric for ages, first in a box and then after they'd been sewn into strips on my noticeboard.  This week I am finally going to make them into a scrappy shabby quilt top. I might even be daring and go and get batting on Friday from my friendly quilt shop otherwise it will get folded up and put in a box for another couple of months!

Mind you the sun is shining so I might be tempted outside for a spot of gardening or possibly snoozing ....

hugs

jo
xx

EDITED: and here's the completed quilt top. I laid it out on the bed to measure it up, when I got back from getting the tape measure, look what I found on it looking cute!

Tuesday 10 April 2012

50's retro

My husband won't be a happy bunny this week as he's at work and I'm off (we have different leave years so I'm using up some of my allocation) and of course at this precise moment in time it is sunny after a particularly wet (good) and cold (bad) Easter weekend. 

Yesterday in our house was a sewing / sowing day, husband in the green house (it's very The Good Life in our house sometimes, not quite sure I have Felicity Kendall's bottom though) sowing  seeds for the veg garden and me in the craft room sewing random bits of fabric to paper.

I like my 8x8 pages but sometimes I just want to go BIG and create something on a larger scale that I can put in a large frame.  I have a lot of wall space in my bedroom and I'm slowly filling it with art like this. 
 
The previous evening I'd been playing with some of my photographs adding finishes, textures and changing the colour, saturation etc.  I printed this one of a very faded red rose we had in the garden last year.  

I attacked it with some sandpaper to remove some of the colour, reveal some of the other colours used in printing and generally roughed it up a bit. I loved how it really made the colours change and it started to look like a hand tinted photo from the 50's that had aged and cracked a bit.  I then added a thickish layer of Rock Candy Crackle and left it to dry overnight.  

Monday morning in the rainy gloom, I  splodged some Rose Fresco Finish paint over an A3 piece of paper, using a sponge and a wet wipe.  I then stamped a large damask stamp with Maroon Archival randomly over the page to look like old faded wallpaper. 

Pulled out some scraps of fabric and started sewing them on, layering up here and there with loads of very wonky stitching!  Took some Hyde Park Fresco Finish and put a tiny amount in a mister bottle and added some water.  Shook it up to mix and they spritzed it randomly over the page especially round the edges.  Once that was dry I gessoed over the top with a roller to tone it all down.

Whilst that was drying I turned to the photo, it was looking good with that crackle on top.  Added some Fresco Finish in Beach Hut (I know it sounds weird, but it just needed some blue in amongst that green and red)  and sewed it onto some rough calico.

I started to add more layers to the background A3, first some paper strips vertically and then some corrugated card horizontally.  Finally a strip of fabric with orange, red and green in it with a riped strand of green cotton attached with some pearlised peacock blue thread (lots of stitching).  The photo was added on top. 

This A3 was then scuffed up at the edges, some walnut stain added and put on top a bigger piece of cream card that had some gesso on it and Old Paper Distress Ink added (straight to paper technique).

And this is it in all it's finished glory - just need to hang it on the wall now!

 
 hugs

jo
xx

Friday 6 April 2012

A REAL shabby dandelion

I think I'm beginning to identify my signature style - layers, made up of fabric and paper with stitching stamping and a focal point.  Sometimes that focal point is a strong stamped image sometimes as in this case it is one of my photographs.

I rarely take photos of people, don't like that forced stand in a regimented group, smile and record the event kind of thing.  Very often I'll use a long lens and take a close up without people even realising I'm taking a photo - far more intimate and more natural (no I don't work for a red top comic).

But my greatest love with photography is close ups of flowers (and stone walls and moss and wood and rusted metal if I'm honest). Before the days of digital cameras I would go through rolls and rolls of film on holiday or day trips to National Trust gardens and my poor husband would become a photographers assistant as I changed film or lenses.

With my photographs sometimes I don't want a clear image, sometimes I want it all aged or faded or roughed up (there's that style thing again), that's why I love Instagram as it has all those delicious filters you can lay over an image.  In this case I did some image transfer using gel medium.  I printed my photos on ordinary white paper and photocopied them.  Spread a thickish layer of gel medium on card and put the image face down on that and made sure it was well adhered.  Let it dry (overnight is best), wet the image and gently rub off the photocopy paper and you get a roughed up image because the image doesn't stick all over and you get odd bits of white space. Love it.

You can of course use black and white images like I did here or colour ones.  But in both you can further colour as you have paper as the base layer not glossy photo paper.  For this one I used Peeled Paint and Broken China Distress Inks over the top - literally just rubbed the ink pad over the image and used a baby wipe just to move it around a bit and soften the edges.

The 8x8 base layer had Peeled Paint and Shabby Shutters Distress Ink with Lettuce ColourWash added.  The stamping using PaperArtsy stamps was done in Aquamarine Archival (love this teal blue colour) 

Once the fabric strips were sewn on I went over them with gesso (rolled on so it wasn't too heavy)  to tone down the brightness. Rubbed back the gesso with a baby wipe where it had gone over the stamped images.  

The scrap of card was inked with Weathered Wood Distress Stain, embossed using a  brick effect folder and then White Picket Fence Distress Stain over that.  Stamped in  Iced Spruce Distress Ink, torn edge and inked with Iced Spruce as well.

The tag was painted in Baltic Blue Fresco Finish, a layer of PaperArtsy Crackle Glaze and then a mixture of Inky Pool and Guacamole Fresco Finish over that. Stamped in Broken china and Aquamarine.  A strip of lime green silk and some metallic line green thread stitching to anchor it all both physically and visually. 

I like it and it makes me happy to make and look at, but the question is would other people like and more importantly do you think they would spend money on buying something like this???? I ask because what I'd really like to do is make art with my photographs and sell on Etsy.  That would be  big step for me in terms of confidence but doing this blog has helped me  "get out there" and feel more confident in my abilities creatively.

Right enough of the self analysis and time for a fortifying breakfast, it is Good Friday which means in our house - tidying the veg patch ready for planting!

hugs

jo
xx